
Temenos Lifecycle Management Suite - Origination Product Guide
Application Workspace
| End-User Guide > Application Workspace |
The workspace is the area where the majority of an application’s actions are performed. The workspace consists of four sections which provides users all the tools necessary to process an application.
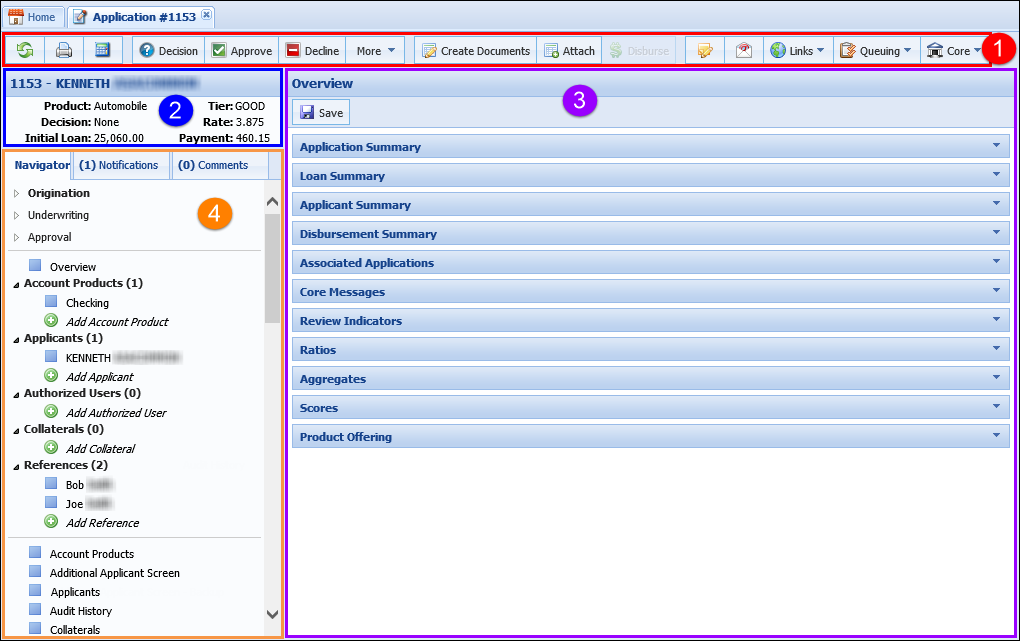
The Application Toolbar is located at the top of the workspace. This toolbar contains a series of icons that relate to linked screens and actions.

The following table displays the icons available in the Application Toolbar along with their descriptions:
 |
In an account application for an existing account holder, the  , ,  , and , and  buttons are disabled in the application toolbar when the administrator has configured the system to automatically approve account applications for existing account holders within the System tab located in System Management > Modules > Origination. buttons are disabled in the application toolbar when the administrator has configured the system to automatically approve account applications for existing account holders within the System tab located in System Management > Modules > Origination. |
| Icon | Description | ||
 |
Refreshes the application and the current screen. | ||
 |
Allows a user to print the screen currently open in the Application Workspace.
|
||
 |
Allows a user to calculate an application.
|
||
|
Allows a user to submit an application to the decision model assigned to the Sub-Product. |
||
|
Allows a user (with the proper permissions) to approve an application that has not been decisioned. |
||
|
Allows a user to select an Adverse Action, Declined Reason, and decline an application. |
||
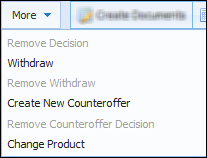 |
Users are able to select additional Decision options by selecting the drop-down adjacent to the Decline button. The additional options include:
|
||
 |
Allows a user to generate documents for the current application. | ||
 |
Allows a user to browse their local or network drive to attach supporting documents to the current application.
|
||
 |
Allows a user to disburse the current application. | ||
 |
Allows a user to post a comment to the current application. | ||
 |
Allows a user to send an Ad Hoc email regarding the current application. | ||
 |
Allows a user to navigate to external websites by selecting a link from the drop-down. These are maintained by your financial institution. | ||
 |
Displays the application's Current Queue and allows a user to:
|
||
 |
Allows a user to:
|
Calculations are performed based on data saved in the database, and take into consideration any financed Debt Protection, Fees, Cross-sell amounts, etc. that are included.
Calculations run synchronously during the processing of an application and are triggered by the following events within Temenos Infinity:
|
When the calculate process is run as a result of the Execute Calculate Application action, the application must be refreshed to see the updated values. It is highly recommended that areas such as Fees, Aggregates, and Ratios are reviewed after the application is calculated to ensure that none of the values were duplicated during the calculation process.
|
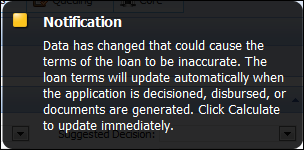
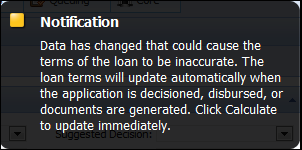
Since Calculations only occur during the above events, calculated payment amounts may not be accurate if loan terms have changed or fees have been included in the loan amount. To ensure the most accurate figures are quoted to customers/applicants, a system Notification alerts users when calculations become outdated or inaccurate.
When a user clicks within the Application Toolbar, the current application is submitted to the Decision Model assigned to the selected Sub-Product. Depending on the configuration of the Decision Model and Decisioning Rules, an application may have one of the following decision results:
| Decision | Description |
| Auto Approve | The application has been automatically approved by Automated Decision Processing. |
| Auto Decline | The application has been automatically declined by Automated Decision Processing. |
| Auto Reject | The application has been automatically rejected by Automated Decision Processing. |
| None |
The Automated Decision Process may not render an Approve or Decline Decision. Applications may have their Status set to Pending Review, which requires a Senior Officer or Underwriter review.
For more information on processing Decisions manually, see the Underwriting section. |
Clicking within the Application Toolbar allows a user to bypass the automated decision processing/model to render an approved decision. When manually approving an application the Decision is set to LO Approved.
Upon clicking , the Approve Application window appears to identify the type of application being submitted for approval.
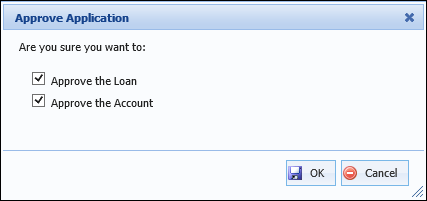
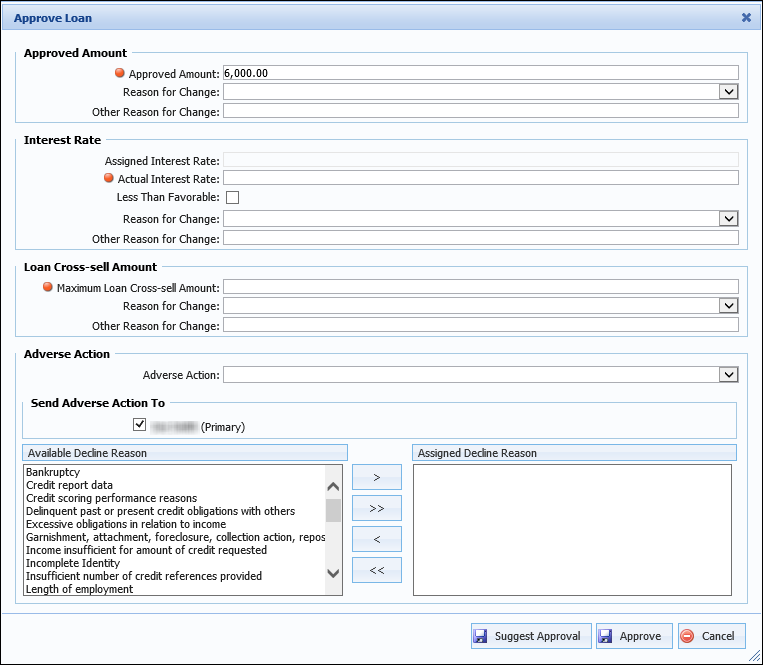
When submitting a loan application for approval, clicking  opens the Approve Loan screen to enter Approval criteria for the loan application.
|
If an account decision is not required, the Approve Application window does not appear and users are navigated directly to the Approve Loan screen. |
For more information, please see the Manual Decisions topic within this guide.
Clicking within the Application Toolbar allows a user to bypass the conventional automated decision processing/model to render a declined decision. When manually declining an application the Decision is set to LO Rejected.
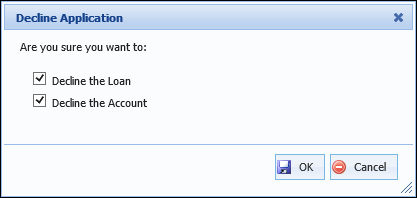
Upon clicking the Decline Application window appears to confirm the application(s) that should be declined:
|
If an account decision is not required, the Decline Application window does not appear and users are navigated directly to the Decline Loan screen to enter the declination criteria for the application. |
After is clicked, the Decline Loan screen appears in the workspace:
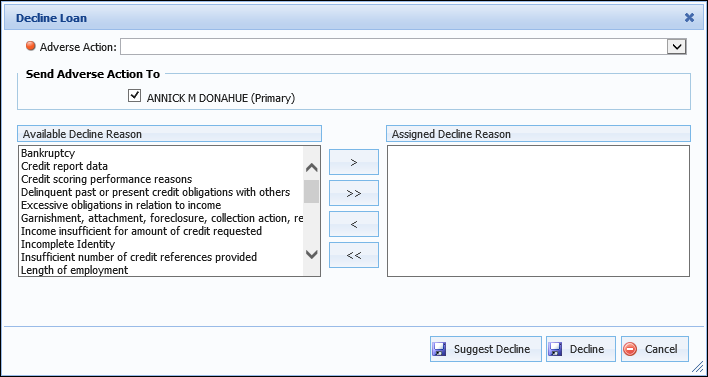
For more information, please see the Manual Decisions topic within this guide.
The following options are available upon clicking  in the toolbar:
|
For more information on the functionality below, please see the Underwriting Review topic within this guide. |
If the current application has already gone through the decision process, the decision can be removed by selecting Remove Decision in the Application Toolbar. A Success message appears when the application is completed. Click OK to proceed with processing the current application.
While processing an application, a user is able to click Withdraw from the Application Toolbar to remove an application from the active application pool. Clicking Withdraw opens the Withdraw Application screen in the Workspace.
If an application has been withdrawn and needs to be reactivated, a user with appropriate permissions is able to click Remove Withdraw from the Application Toolbar to reactivate the application.
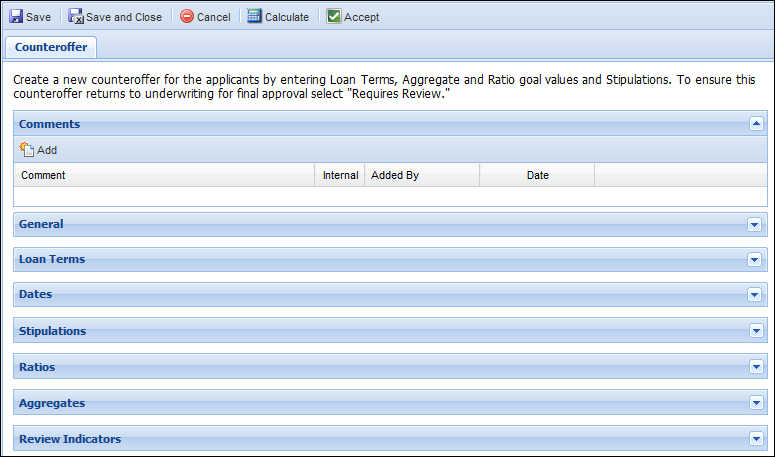
Rather than rejecting an application if the current Loan Terms are undesirable to an institution or a decision cannot be reached using the current terms, a user with appropriate permissions is able to create counteroffer(s) that contain alternative Loan Terms that are more desirable to the institution. In order for a Counteroffer to be issued, the application must have a status of In Progress, Pending Review, or Countered. Once created, Counteroffers are able to be reviewed with applicants prior to acceptance.
|
A single loan application can contain multiple Counteroffers. |
Counteroffer processing can proceed automatically, if indicated, without resubmitting to the decision engine. Clicking Create New Counteroffer opens the Counteroffer screen in a new window.
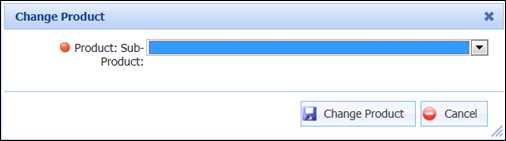
Within an application, a user with appropriate permissions is able to change the product assigned to the current application.
|
A product cannot be changed after a loan decision or account decision is rendered for an application; therefore, after the loan or account has been decisioned, the Change Product button is disabled within the More drop-down. Additionally, if the ACCOUNT_DECISION_FOR_EXISTING_ACCOUNT_HOLDER parameter is set to Auto Approve by the system administrator, the Change Product button is disabled in an account application since the account is automatically decisioned. |
Selecting Change Product opens the Change Product window in the workspace. The drop-down in this window includes a list of all active loan or account application types configured by the administrator in System Management > Origination > Loan > Loan Application Types or System Management > Origination > Account > Account Application Types.
 |
While a product can be changed from an account application to a loan application in the Change Product window, a loan application type cannot be changed to an account application type. When a loan application is in progress, the Product: Sub-Product drop-down only includes the active loan application types configured by the system administrator. When an account application is in progress, all active loan and account application types appear in the Product: Sub-Product drop-down. |
|
When an application is created from a promotional offer, the availability to the Change Product button is determined by the number of application types assigned to the promotion by the system administrator.
|
|
For more information on the Change Product functionality, please see the Other Decision Processes topic in this guide. |
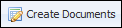
The Create Documents function enables users to create documents for the current application.
Clicking navigates users to the screen that corresponds with the documents connector implemented at the institution.
For more information on creating documents, please refer to the applicable third party document processing connector guide.
The Attach File function allows users to browse their local or network drive to attach supporting documents to a particular application (for example, copies of paystubs or copy of insurance). This window also provides the ability to view documents uploaded from Virtual Capture, or another third party.
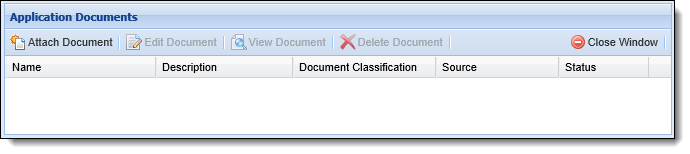
Clicking opens the Application Documents screen in a new window. The Application Document screen contains a toolbar that allows users to perform the following functions:
| Function | Description |
 |
Enables a user to attach a document to the application. |
 |
Enables a user to edit the attributes of a previously attached document. |
 |
Enables a user to view a document that is attached to the application. |
 |
Enables a user to remove an attached document from an application. |
 |
Enables a user to close the Application Documents screen. |
For more information, please see the Attach File topic within this guide.
The disbursement function allows users to disburse an approved loan application to an institution’s core. If an application is not approved, is not able to be selected.

For more information on disbursing an application, refer to the Disburse topic within this guide.
Clicking in the toolbar opens the Post Comment window in the workspace.
The Post Comment function enables users to add comments to the current application.
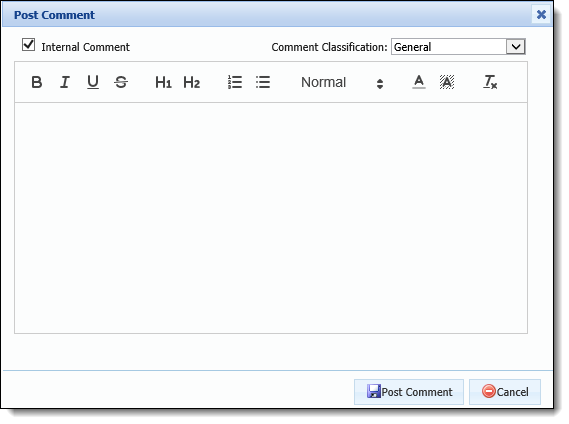
The Post Comment pop-up window contains the following fields:
| Field Name | Description | ||
| Internal Comment |
By default, this check box is selected to ensure the comment being created is not transmitted outside of the institution. If desired, clear the Internal Comment check box to transmit the comment to an outside party.
|
||
| Comment Classification | Select an option from the drop-down list to identify the comment type. This drop-down defaults to General, and includes a list of the values configured for the COMMENT_CLASSIFICATION lookup in System Management > Origination > Field Configurations. | ||
| Text Box | Enter the comment text. If desired, use the toolbar within the top of the box to modify the format of the text. |
When all applicable fields are complete, click  to save the comment to the application.
Upon adding a comment, the comment is stored within the Comment History, and can be accessed from the Comment History screen or panel in the application. The comments associated with an application also populate within the Comments tab of the Application Navigator.
|
Comments can be added to an application in multiple locations. |
Users with appropriate permissions are able to compose and send emails regarding the current application.
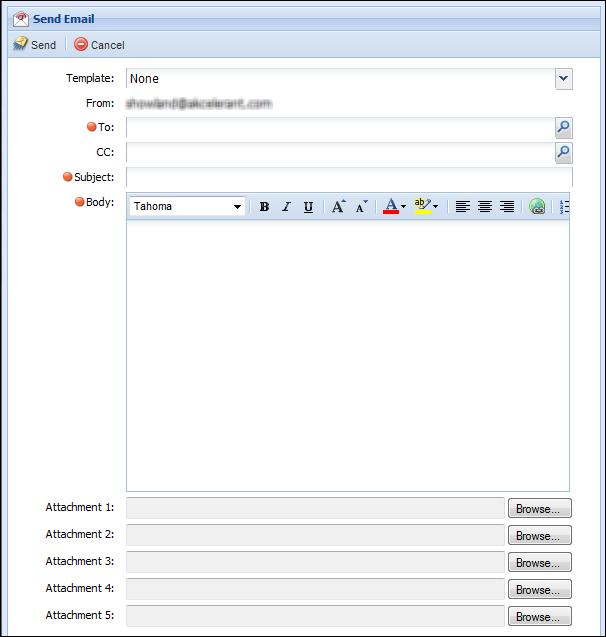
When composing an email, users have two options:
Within the Compose Email screen, users are able to complete the following fields:
| Field | Description | ||||
|
Template |
Use the drop-down list to select the template that transmits the first five outstanding stipulations. |
||||
|
To |
Enter the email address of the applicant/recipient of the email. |
||||
| Subject |
Enter the title of the email.
|
||||
| Body |
Enter the message to be transmitted to the applicant/recipient.
|
||||
|
Attachment 1-5 |
Click Browse to attach up to five documents to include within the email.
|
The Email History screen displays all emails sent within a specific loan application. Emails populate within a grid that displays the Message Type, Subject, Recipient(s), Sent Date, and Sent By information.

Users can refresh the emails that populate in the grid and specify the emails that populate in the grid according to a specified date range.
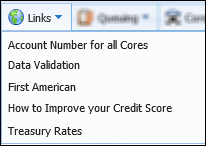
The Links button allows users to access a variety of institution-approved webpages by selecting a hyperlink stored within Temenos Infinity. Clicking the Links icon opens a drop-down list with all the company-approved links. Select a link from the drop-down to navigate to the external web page.
|
Users with appropriate permissions are able to manage Links by navigating to System Management> Origination > Hyperlinks. |
The Queuing button allows a user to select a variety of queuing options on the current application.
The Current Queue option displays the queue that the current application is assigned to.
The Pin To Queue option enables a user to disregard queuing rules and assign the current application to a specific queue.
|
If an application has been pinned to a specific queue, it remains pinned to the specified queue until a user with the appropriate permission unpins the application from the specified queue. |
The Unpin from Current Queue option enables a user with appropriate permissions to unpin the current application from a user-designated queue.
|
When an application is unpinned from a queue, queuing rules run after exiting the application. |
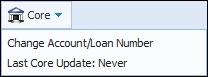
The Core button allows a user to perform a variety of core-specific options on the current application.
By selecting Change Account/Loan Number, users are able to reselect the account number for the account holder, loan and/or account product(s) assigned to the application. With the appropriate permission, users are also able to create a new record in the core system for an existing primary account holder. Selecting Change Account/Loan Number opens the Change Account Numbers screen within the workspace.
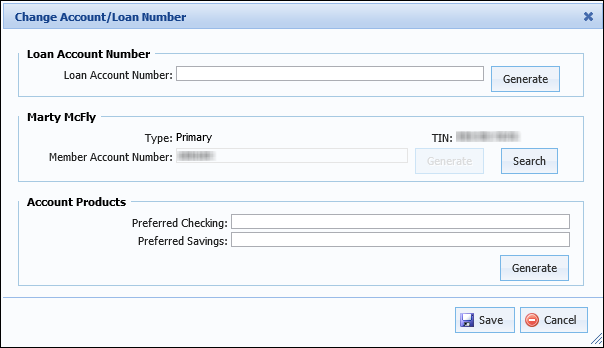
For more information, please see the Funding topic within the Post-Decision Approval section of this guide.
|
An application cannot be updated from the core if it is disbursed, withdrawn, had a disbursement error, or a disbursement is pending. |
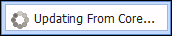
Update from Core enables users to update the application with the current information in the core. The Update from Core function searches the core processor for current information based on the account number assigned to the application.
When Update from Core is clicked, the process initiates and an indicator appears in the application workspace.
The following information updates during this process:
|
During the Update from Core process, Applicant Import rules are run to obtain information from the core; therefore, the fields updated with this process are dependent upon the core used by the institution. For more information, please see the field mapping document for the applicable core.
|
 |
If a core amount differs from an amount in Temenos Infinity, a message is displayed. |
Once the update from core process completes, the Last Core Update information populates with the date it was processed.
The Application Summary is always displayed and updates throughout the duration of the application. It contains the application number and the name of the primary applicant. It also contains information specific to the current application, such as the Field Values (Rate/Purpose), Aggregates, Ratios, and Scores.
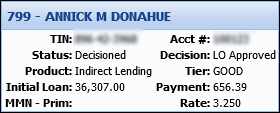
The values that populate within the Application Summary are configured by the system administrator at the Sub-Product level.
|
For more information on configuring this section of the workspace, please see the Workspace Summary section of the Loan Application Types or Account Application Types topic. |
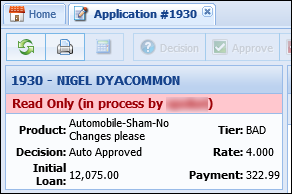
The Application Summary also alerts users when an application is in a Read Only state. An application enters a read only state in the following situations:

|
When an application finishes disbursement, it the lock is removed. Refresh or re-open the workspace after the application has been disbursed to enable editing of the application. |
The Application Workspace is where all of the data entry is performed on an application. The information in the Application Workspace is either entered manually by the user, automatically populated by Temenos Infinity’s connection with the core, or imported from a Vendor Channel/Source.
Creating an application or selecting an application from a queue opens the application workspace.
The Application Workspace contains a Screen Toolbar. The Screen Toolbar varies according to the current screen and whether a workflow is being used.

|
The appearance of the Screen Toolbar depends on the screen type. For example, if a screen is a “grid screen,” panels would not exist by design; therefore, the ability to Minimize and Maximize Panels would be unnecessary. |
The Screen Toolbar contains the following Default icons:
| Icon | Description |
 |
Allows a user to Save the changes made to the current screen. |
 |
Allows a user to minimize all of the current screen's panels. |
 |
Allows a user to maximize all of the current screen’s panels. |
 |
Indicates that the screen contains instructions. Click the icon to view the screen’s instructions. |
When using Workflow, the screen toolbar also contains the following Workflow specific icons:
|
In an account application for an existing account holder, the , , and buttons are disabled in the screen toolbar when the administrator has configured the system to automatically approve account applications for existing account holders within the System tab located in System Management > Modules > Origination. |
| Icon | Workflow Stage | Description | ||
 |
All | Allows a user to navigate to the previous screen of the Workflow. | ||
 |
All | Saves the screen and allows a user to navigate to the following screen of the Workflow. | ||
|
Origination |
Allows a user to submit an application to the underwriting process. |
||
|
Underwriting |
Allows a user with the proper permission to approve the current application. |
||
|
Underwriting |
Allows a user with the proper permission to decline the current application. |
||
 |
Underwriting |
Allows a user with the proper permission to counter the current application.
|
||
|
Approval | Allows a user to disburse an approved application to the core. |
In addition to the Default and Workflow icons, the Screen Toolbar also contains a variety of screen-specific icons that change according to the current screen.
|
When a tooltip is configured for a field,
|
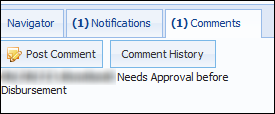
The Application Navigator is located on the left-hand side of the workspace. It contains a series of tabs that assists users with processing applications. These tabs include Navigator, Notifications, and Comments.
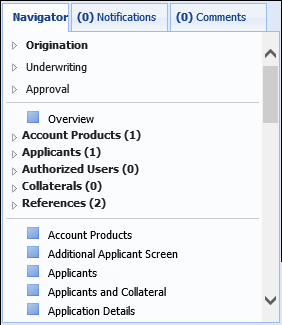
The Navigator panel contains all of the screens assigned to the Sub-Product’s workflow model.
The Navigator panel contains three sections:
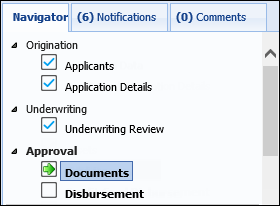
The Workflow is located at the top of the Navigator tab. It is a predetermined series of screens that aid users in the application process. The screens that appear within the Workflow are driven by the Workflow Model and are tied to the Application Type. This feature serves as a roadmap that dictates the proper order for completing an application.
|
The workflow is not the mandatory order to complete an application. Users can ignore a Workflow and complete the application by manually selecting Screens from the Application Navigator. However, if an application is being completed by selecting the screens,  and and  are not available. are not available. |
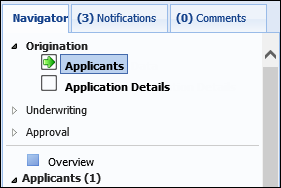
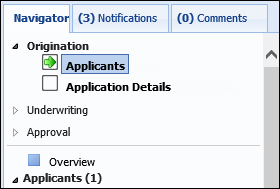
When a new application is created, the first screen within the Workflow displays. A  appears next to the screen name to identify it as the screen currently in progress.
|
Please see the Application Progress Indicators section below for more information about the indicator icons that appear within the Workflow. |
While navigating the Workflow, users are able to click or to progress through the application. Users are also able to navigate a Workflow by selecting each screen individually, rather than clicking the aforementioned buttons.
The Workflow includes the following stages:
| Stage | Descriptions |
| Origination | The Origination category contains the screens that are required to be completed in order to decision an application. The Decision button is enabled within the Screen Toolbar when the final screen is reached in the Origination category. |
| Underwriting | The Underwriting category contains the screens that are used to decision an application and give underwriters the information required to properly decision an application. |
| Approval | The Approval category contains the screens that are used to complete the post-approval processing of an application. If the application has been declined, the Approval category is removed from the Workflow and it is replaced by Decline. |
| Decline | The Decline category contains the screens that are used to complete the post-decline processing of an application. The Decline category only displays in the Workflow if the application has been declined. |
|
The screens assigned to each category are configured in System Management > Origination> Screens by the administrator. Each stage may be configured with any screen desired by the institution; however, the stage names indicate the intended purpose. |
Within the Workflow, the following icons may appear to assist users with tracking an application's progress:
| Icon | Description |
 |
Identifies a screen as completed via Save and Next. |
 |
Identifies a screen as the current screen in the application workflow. |
| Identifies an incomplete screen in an active stage of the application workflow. | |
| Identifies an incomplete screen in an inactive stage of the application workflow. |
When a new application is created, the workspace opens to the first screen in the Origination stage of the workflow.
|
When an existing application is loaded, the workspace automatically opens to the screen that was in progress when the application was last open. |
The screen is highlighted blue and a appears next to the screen name to identify it as the screen that is currently in progress. Since the Origination stage is active, the category header and each screen name under the category appear bold, and a ![]() appears next to any incomplete screens as shown below:
appears next to any incomplete screens as shown below:
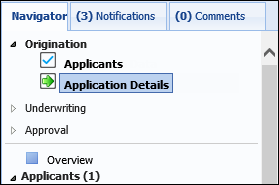
Once all information within the screen is complete and is selected, a appears to identify the screen as complete. The application progresses to the next screen in the workflow, which becomes the current screen as indicated by a .
|
If a screen is not completed by clicking , the user is unable to successfully progress through the application workflow. While screens can be selected and saved out of sequence, Save and Next are not permitted until the screen identified as the current screen with a is complete. Upon clicking within an incomplete screen, the user is navigated back to the current screen in the workflow. |
When an application is decisioned, disbursed, a decision is removed or a product is changed, the indicator icons automatically adjust and users are navigated to the applicable stage in the workflow.
For example, when an application is manually approved, the user is automatically navigated to the first screen in the Approval stage and all screens under the Origination and Underwriting categories are marked with a as shown below:
|
When a user is automatically navigated to a specific stage in the workflow, all other workflow categories are collapsed. The Origination and Underwriting categories are expanded in the screenshot below to provide an example. |
Reference the table below for an overview of the actions that occur as a result of the following application events:
| Event | Action |
| Application Decisioned - Approve | All screens under Origination and Underwriting are marked complete with a  and the user is navigated to the first screen in the Approval stage. and the user is navigated to the first screen in the Approval stage. |
| Application Decisioned - Decline | All screens under Origination and Underwriting are marked complete with a and the user is navigated to the first screen in the Decline stage. |
| Application Decisioned - Pending Review | All screens under Origination are marked complete with a and the user is navigated to the first screen in the Underwriting stage. |
| Disburse Application | All screens under Origination and Underwriting are marked complete with a . |
| Remove Decision | All screens under the Underwriting, Approval, and Decline stages are marked incomplete and the user is navigated to the last screen in the Origination stage. |
| Change Product | All screens are marked as incomplete and the user is navigated to the first screen in the Origination stage. |
The People, Products, and Collateral section is located between the Workflow and Screens sections. This section contains an index of all People, Products, and Collateral associated with the application. Additionally, this section contains the Overview screen.
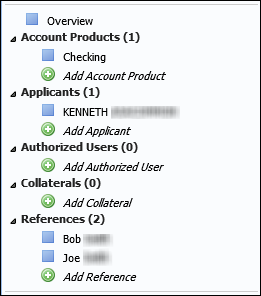
The following example displays how this section appears within an account application:
|
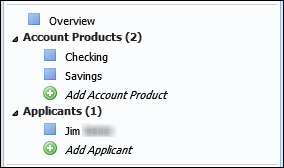
If a description is entered for an account product in the Account Product screen, the description text is appended to the account product name in the Application Workflow and Account Products section of the Application Navigator as shown below:
|
The Overview screen is a user-defined Application screen that provides users a quick summary of the application. This screen can be configured with informational fields and panels that display important application information. For example:
The Overview screen is also the default screen displayed when an in-progress application is re-opened.
The People, Products and Collateral section displays all Account Products, Applicants, Authorized Users, Collaterals, and References associated with a loan application or all Account Products and Applicants associated with an account application. In addition to displaying all People, Products, and Collateral records, users may be able to Add, Edit, and Delete records from the application.
|
The Applicants, Authorized Users, Collaterals, and References collections only populate if corresponding screens are mapped to the Workflow Model. The Account Products section only displays when at least one account product is active within Temenos Infinity. |
To manage People, Product and Collateral records:
 provides the ability to add an applicant to an application.
 The Screens section is located at the bottom of the Navigator. It contains a list of all screens available in an application’s workspace. All of the Screens that appear in this section are listed in alphabetical order.
|
Screens are driven by the Workflow Model and tied to the Sub-Product. The Screens list and the Workflow do not need to include the same screens; therefore, the Screens section may contain screens that are not assigned to Workflow. |
Depending on the configuration of the Workflow Model, users may be able to process an application by selecting screens from this list.
|
While processing an application by manually selecting screens, does not appear in the Screen Toolbar of the final screen required to originate the application. This button only appears if the Workflow is used. To submit these applications to Underwriting, the user must click , , or within the Application Toolbar. |

The Notifications tab displays all informational and validation messages that have been called by rules when an application is saved, calculated, or called by actions. Notifications help users complete all required application information and quote the most accurate calculations.
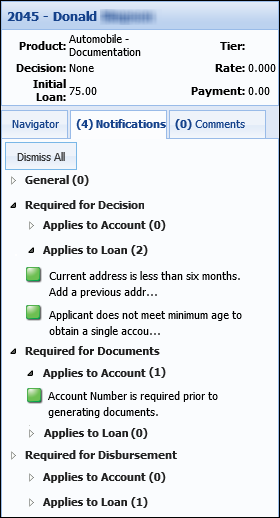
When Notifications generate, the tab header updates with the total number of Notifications that need to be cleared. Additionally, when notifications generate, a pop-up notification appears in the application workspace. Notifications remain stored within the Notifications tab, until they are dismissed or cleared.
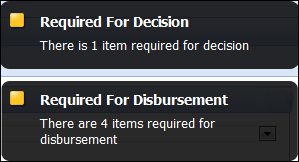
It is possible for multiple Notifications to be generated simultaneously, which could cause a great deal of clutter within the workspace. For this reason the Required For Decision and Required For Disbursement categories receive consolidated messages that alerts users how many items exist for decision or disbursement.
Once users navigate to the Notifications tab in the Application Navigator, they are able to view the Notifications that have been generated.
The General Notification category contains various types of validations, alerts, stipulations, and To-Dos that remain outstanding for the processing of the application. All system generated notifications appear in this category.
Notifications in this category may include:
|
Users are able to Dismiss General Notifications if the application is locked by another user. |
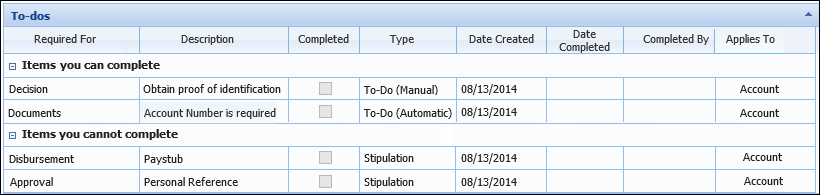
 Required for Decision, Documents, and Required for Disbursement Notifications
The Required for Decision, Required for Documents, and Required for Disbursement categories contain validations and stipulations that must be completed prior to rendering a decision or disbursement. These validations may include To-Dos.
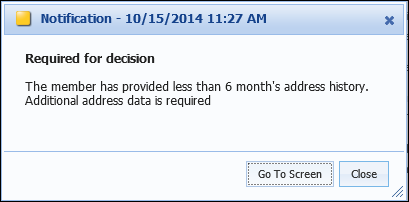
To-Dos are a series of validations or stipulations that are called by rules when an application is saved. To-Dos permit rule authors to guide users to enter the data that may be missing or other actions that must be taken before an application can be decisioned or disbursed. To-Dos can also be assigned to specific screens and can prevent applications from being decisioned or disbursed with incomplete information. For example, a To-Do can be written to call attention to an applicant’s length at the current address if it is not long enough. Failure to add a previous address prevents the application from being decisioned/disbursed.
|
If a To-Do is linked to a screen, users are able to access the linked screen even if they do not have permission to view the screen. |
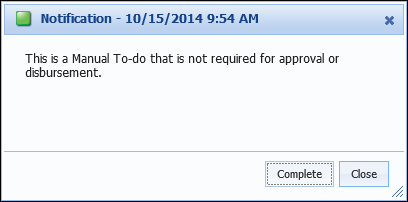
Manual To-Dos are not data-driven validations, which automatically update when linked information is updated within the application. In order to clear a Manual To-Do, users with the appropriate permission must access the Notifications tab, select the Notification/Manual To-Do and click the Complete button in the Notification pop-up.
Unlike a traditional To-Do, Manual To-Dos are not linked to specific data. The only way a Manual To-Do may be removed is by completing it.
|
Once a Manual To-Do is completed, the information is updated in the database. A Manual To-Do does not re-generate even if information changes on the application that would normally cause a Manual To-Do to generate. |
Manual To-Dos can be added to Workflow Validation categories such as: Decision, Disbursement, Post Disbursement, and Post Decline.
|
To-Dos are not stored in the Audit Log. Once they are cleared, the To Do is removed from the application. |
In addition to populating in the Application Navigator and Workspace, To-Dos populate in a To-Dos panel. This panel is typically assigned to Application screen types in the Underwriting and Approval categories.
Although both types of To-Dos populate in this panel, only Manual To-Dos are able to be cleared. Automatic To-Dos are only able to be cleared by completing the missing information that caused the validation failure.
|
Notifications are able to be generated by Validation Rules. For more information on rule configuration, refer to the Rules topic in the Administrator Guide. |
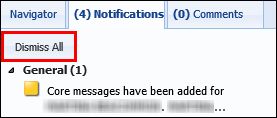
The Notifications tab contains the Dismiss All button. This button enables users to quickly dismiss all notifications that are eligible to be dismissed.
Notifications that can be dismissed include the following examples:
|
Disbursement validations exist for ID check and OFAC failures. |
Notifications that cannot be dismissed include the following examples:
|
Notifications that cannot be dismissed with the Dismiss All button must be satisfied by performing the required action, meeting the stipulation, or completing the To-do. |
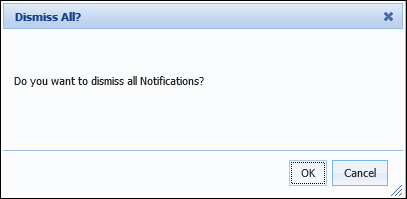
To dismiss all notifications, click the Dismiss All button. Once selected the Dismiss All prompt appears on the screen. Click OK to dismiss all notifications. Click Cancel to retain the notifications.
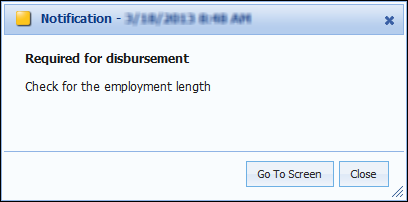
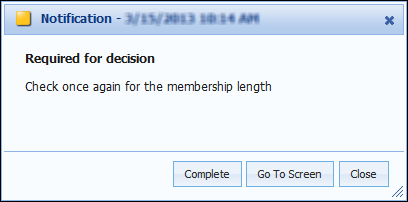
From the Notifications tab, users are able to complete the to-dos that they have permission to clear. To complete to-dos, select the desired to-do from the list. A notification pop-up window appears. Within the notification, users may have the ability to Complete the to-do or Go To the Screen where the missing information can be provided.
|
To-dos that can be completed are noted with a  . If a user selects a notification that can be completed, clicking Complete within the Notification window completes the to-do. . If a user selects a notification that can be completed, clicking Complete within the Notification window completes the to-do. |
|
To-dos that cannot be completed and dismissed are noted with a  . If a user selects a notification that cannot be completed or dismissed, only the Close button displays. . If a user selects a notification that cannot be completed or dismissed, only the Close button displays. |
The Comments tab allows users to View and Create Comments that are assigned to the current application. The corresponding number within the tab header updates with the total number of Comments assigned to the application when a comment is created.
The Post Comment function enables users to add comments to the current application.
The Post Comment pop-up window contains the following fields:
| Field Name | Description | ||
| Internal Comment |
By default, this check box is selected to ensure the comment being created is not transmitted outside of the institution. If desired, clear the Internal Comment check box to transmit the comment to an outside party.
|
||
| Comment Classification | Select an option from the drop-down list to identify the comment type. This drop-down defaults to General, and includes a list of the values configured for the COMMENT_CLASSIFICATION lookup in System Management > Origination > Field Configurations. | ||
| Text Box | Enter the comment text. If desired, use the toolbar within the top of the box to modify the format of the text. |
When all applicable fields are complete, click to save the comment to the application.
During the application process, comments can be added to an application using the Post Comment functionality in Temenos Infinity, and viewed within the Comment History screen and/or panel.
The Comment History screen is a system-defined screen that can be accessed by clicking Comment History within the Comments tab in the Application Navigator, or from the Screens List if assigned to that section of the workflow by the system administrator. The Comment History panel can be added to an Application screen, which can also be accessed from the Screens List in an application if assigned to that section of the workflow.
Both the Comment History screen and panel display an overview of the comments on an application, and provide the ability to add and manage comments throughout the application process.
|
While the following image displays an example of the Comment History screen, the Comment History panel includes the same functions and filters as shown below, and populates the same information for each comment within the grid. |

The grid that appears in the Comment History includes the following columns of information for each comment:
| Column | Description | ||
| Comment | Displays the comment text, including any formatting applied to the text when the comment was added. | ||
| Created By | Displays the username of the user who added the comment. | ||
| Date Created | Displays the date and time that the comment was added to the application. | ||
| Modified By | Displays the username of the user who last modified the comment. | ||
| Modified Date | Displays the date and time that the comment was last modified. | ||
| Internal Comment | Displays a  if the comment is marked as an internal. Internal comments are only posted in the Lifecycle Management, and are not sent to the core, or applicable third party. if the comment is marked as an internal. Internal comments are only posted in the Lifecycle Management, and are not sent to the core, or applicable third party. |
||
| Object Type |
Displays the object to which the comment is related. For example, Application or Real Estate Order.
|
||
| Comment Classification | Displays the comment classification. For example, General. |
Within the top of the screen, the following actions are available to allow users to refresh the screen and/or filter the comments that appear in the grid:
| Action | Description | ||||
 |
Provides the ability to add a comment to the application. |
||||
 |
Provides the ability to modify an existing comment.
|
||||
 |
Provides the ability to refresh the information that appears in the grid. | ||||
| From/To | Provides the ability to filter comments according to the date they were posted to the application. By default, one month of comment history is displayed within the grid; however, the date range can be modified by clicking within the From and/or To box, and manually entering the desired date, or selecting a date from the calendar that appears. | ||||
| Object Type |
Provides the ability to filter comments according to their Object Type. This drop-down includes the following values:
|
||||
| Comment Classification |
Provides the ability to filter comments according to their comment classification. This drop-down includes a list of the values configured for the COMMENT_CLASSIFICATION lookup in System Management > Origination > Field Configurations, as well as an option for All, which displays all comments on the application, regardless of their classification.
|
The Comment History screen and panel provide the ability to perform the following actions:
To add a comment to the application, click in the top of the Comment History grid. The Post Comment window appears.
Once posted to the application, the comment appears within the Comment History grid.
|
All comments with an Object Type of Application are also listed within the Comments tab in the Application Navigator. |
|
When a comment is added to an application, Notifications may generate to alert users in specific Notification Groups about the comment. For more information on the Notifications functionality, please see the Notifications topic in this guide. |
|
Comments with the Internal check box set to false cannot be modified. Additionally, the button is disabled in the top of the Comment History screen and panel if the user does not have permission to edit comments on an application. |
To modify an existing comment:
.  to save the modifications, and close the Edit window.
 displays next to the field label. Hover over the